Friday, July 27, 2012

Internet Explorer 32-bit Crashing = Dell Driver Fail


Recently I had made some changes to my MDT server, primarily updating my custom WIM’s with the latest Microsoft updates and organizing/updating drivers.

I had a user who needed a new machine sooner rather than later, so I fire up a spare Dell Optiplex 980, boot to the network and deploy the needed image from my MDT server. She had some custom software which needed to be installed that was not a part of the deployment, so I installed and configured those manually.  Using Windows Easy Transfer, I transferred her user data over to the new computer and we were ready to rock, or were we?

I decided to hop on the web to download something and immediately, IE 9 crashes in an infinite loop.  “Internet Explorer has encountered a problem and needs to close”.  Dumbfounded, I try IE 64-bit and it works fine.  I check Event Viewer and the following error is displayed, all the "unknowns" were very helpful:


I try opening IE 9 32-bit in safe-mode(no add-ons), and the crashing continues.  I uninstall Internet Explorer 9 and IE 8 32-bit does the same thing.  This has never happened before and I am getting very frustrated.  I start uninstalling everything and when I get back to no 3rd party software on the system, IE 32-bit still crashes!  In the meantime, I have our desktop guy run the deployment on an Optiplex 790, and he has the same problem.

Now I am really in a time crunch, thinking maybe IE somehow got corrupted during image capture, I resort to deploying Windows 7 from source(ISO import).  The deployment finishes and confident we are good to go, I click on Internet Explorer(8 this time as I decided to leave 9 out of the deployment for troubleshooting purposes) and IE crashes again!

Finally I burn a Windows 7 CD, install from the CD and bam, IE works.  I get the computer updated, software installed and computer on her desk.  But I still have the problem on my deployment server.

After some browsing on the TechNet forums, I come across a post with a similar problem, except their event viewer logs gave more information than mine.  The problem seemed to be directly related to the AMD video card drivers available on the Dell website!  The resolution was to revert to older Dell drivers, or install the latest drivers from AMD’s website.  So we did this on the Optiplex 790 and Internet Explorer worked like a charm.

Turns out, the latest driver cabs I downloaded from Dell for the 980/790’s had these bad drivers and both systems used them.  Had I run the deployment on a Optiplex 755 with older ATI video cards, I would have known the Image itself was fine.

In the end, I deleted all of the desktop AMD video drivers from my deployment, imported the latest drivers from AMD’s website and our problem is solved.

Monday, May 7, 2012

MDT - Error Deploying Custom Images via Flash Media

Today I came across an interesting problem that had me quite perplexed.  In my previous blog, I had configured a Windows 7 deployment for the Dell XPS 13 via MDT 2010 and USB flash media.  In that setup, I was deploying W7 from the source media.  However, Microsoft updates was absolutely killing my deployment time, adding nearly 30 minutes to the deployment.  To combat this, as I have in the past, I decided to capture a custom image with Office 2010 and all current Microsoft updates installed.

After capturing my image and adding it to my deployment, I updated my selection profile, then updated my flash media.  However, upon attempting to image the XPS 13,  the deployment failed after the Injecting Drivers task and I was presented the following error:

ERROR - Unable to find SETUP, needed to install the image ImageName.wim.

The reason for my confusion was I have deployed four other custom images in the past using nearly the exact same method and they all worked like a charm.

In short, the reason this error occurred was I had selected the option "Setup and Sysprep files are not needed" when importing the operating system.

Why was this never required before?  After some searching, I found a forum post by Johan Arwidmark, in which he went into more detail.  As it turns out, when MDT attempts to deploy an image, if there are no setup files with the image, it will look elsewhere in your deployment share to attempt to locate the needed files.  If you have previously imported the W7 source files, it will use the setup files from there.

In my situation, I had removed the source files from my USB flash media to save disk space.  The solution:

  1. Re-import the custom wim.
  2. Select "'Copy Windows Vista, Windows Server 2008, or later setup files from the specified path." and select the path to your source files.  ex. ..\DepShare\Operating Systems\Win_7_Ent_SP1
  3. Update your operating system selection for your Task Sequence.
    1. Open your task sequence properties, then click the "Task Sequence" tab.
    2. Expand the "Install" section, then click on "Install Operating System".
    3. Click the "Browse" button under "Operating system to install".
    4. Select the OS you just imported and apply the changes to your task sequence.
  4.  Now just update your flash media and you should be ready to go.

Thursday, April 5, 2012

MDT 2010 - Automated Dell XPS 13 Deployment(for the most part)

Updated 4/12/2012: Instructions added for connecting to your wireless network as part of the task sequence.

Updated 8/1/2012: As of 7/25/2012, new driver CAB's are available for the XPS Ultrabook line AND WinPE.  You can find the XPS 13 driver CAB's HERE.  As noted below, touchpad still requires application installation for multi-touch gesture functionality.
 

I say "almost automated" because to my knowledge there is no way to join a wireless network as part of the task sequence.  This causes the join domain task to fail, then the task sequence will loop on the "recover from domain" task until connected to a wireless network with access to a DC.

Edit: I have since discovered a solution for adding a wireless profile as part of the task sequence to resolve this issue.  I have updated the instructions to include the new material(In blue text).  The task sequence is now completely automated aside from actually launching the deployment.  Per best practices, I chose to leave the BDD welcome screen enabled.  This gives you one last chance to cancel the deployment before the hard drive is wiped. 

Welcome to the wonderful world of ultrabooks, where we don't have NIC's to PXE boot from!  If you were wondering how you might go about deploying Windows 7 Enterprise to one of these XPS 13's, here is how I did it.

First off, as there is no way to PXE boot this laptop, I have opted to perform the deployment from a USB Flash Drive.  This guide assumes you will deploy entirely from the flash drive and not from a dock with LAN connectivity.  My selection profile contains nearly 8GB of data so I went with a 16GB Flash drive to allow for expansion.

Step 1.  Preparing the Flash Drive.
See the following link for a detailed explanation on how to properly prep your flash drive to become a boot device: http://www.intowindows.com/bootable-usb/

Step 2.  Preparing your deployment share.
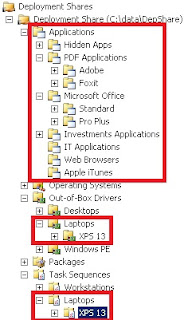
Assuming you want the minimal number of OS images, drivers and software installs, you will want to organize your deployment share in such a manner as to allow you to individually select these items.

As you can see in my illustration, I have created nested folders to separate the various software, operating systems, drivers, and task sequences.

This allows me to create a selection profile for the deployment to copy only the software I need for my XPS 13 deployment.


Step 3.  Preparing Input Driver Installation.


As noted at the bottom of this page, in order for the multi-touch gestures to function properly, this software must be installed manually.

I used 7-zip to extract the Dell executable to a folder and import the installation folder manually.  During the application import process, I use the following command to perform a silent installation of the Touchpad software:
  • "setup.exe /exenoui /quiet /norestart"
Step 4.  Create an XPS 13 Selection Profile, selecting your the software/OS/drivers/task sequence.
  •  Create a selection profile, and select the applications(don't forget your touchpad application), operating system and XPS 13 drivers you want to be included on your Flash media.

    Step 5.  Create a Task Sequence for your XPS 13 deployment.
    • Create a new task sequence specifically for your XPS 13.
    • Modify your task sequence to make deployment easier:
      • Under the "Preinstall" section, select "Inject Drivers".  In the "Selection Profile" drop-down, select your XPS 13 driver selection profile.
      • Under "State Restore", add a new "Run Command" after "Gather Local Only".
        • As seen in the image below, add the following command:
        • netsh wlan add profile filename="%ScriptRoot%\wireless.xml" user=all
        • Under "State Restore", add three new "Install Application" tasks
          • Input drivers (gives you mouse functionality for adding to wireless)
        • Configure the rest of the Task Sequence as you normally would. 
        • Don't forget to go back and add this task sequence to your Selection Profile
        • I recommend capturing a custom WIM of your operating system with all current Microsoft updates.  This will greatly decrease your deployment time.  If you have done this already, you can disable "Pre-Application" Windows updates as well.
      Step 6.  Export your corporate wireless profile to an XML file and add to deployment share.
      • In the previous step we added a netsh run command to our task sequence which referenced the "wireless.xml" file.  Now we will create, configure and copy this file to our "Scripts" folder(%ScriptRoot%) on the deployment share.
        • On a computer connected to your corporate wireless network, run the following command:
          • netsh wlan export name="NameOfWirelessNetwork" folder=%userprofile%\desktop interface="Name of Wireless Adapter"
          • You can find the name of the adapter here: "Control Panel\Network and Internet\Network Connections"(in my case "Wireless Network Connection")
        • After executing the command in the previous step, you will have an xml file named after your network and adapter name(ex. Wireless Network Connection-Firm-Corporate.xml)
          • Rename this file to wireless.xml for simplicity and to conform to our netsh command in the task sequence.  Then edit the file, making the following changes in the <SharedKey> section:
            •  <protected>true</protected> change to false
            • <keymaterial>string of text</keymaterial> delete the string and add the key to your wireless network.
        • Now save the XML file and copy it to the Scripts folder in your deployment share.
      Step 7. Add a New Deployment Media
      • Under "Advanced Configuration", right-click Media and select "New Media".  
      • For "Media Path", I setup a share on my local workstation and specified that UNC path here.  ex. \\pc-name\usb_dep
      • Click the "Selection Profile" drop-down and select your XPS 13 selection profile. 
      • Finish the wizard.
      Step 8. Configure Your Deployment Media
      The deployment media has properties identical to your deployment share.  As such, you will need to configure your "Media Properties" accordingly.  Note: We only install 64-bit Windows on our workstations, so this config is geared specifically to 64-bit.  Here is an example of my config:
      • General Tab
        • Verify correct selection profile is selected
        • Uncheck "Generate x86 boot image"b
        • Uncheck "Generate Lite Touch bootable ISO image"
      • Windows PE x64 Components
      • Rules Tab - configure customsettings.ini and bootstrap.ini.
        • Below is an example of my customsettings.ini file.  For the most part I copied it from my deployment share, but then modified it to perform an automated install.  NOTE: Items in red must be in bootstrap.ini for automated deployment.
       [Settings]
      Priority=Default

      [Default]
      OSInstall=Y
      SkipBDDWelcome=NO
      SkipAppsOnUpgrade=YES
      SkipAdminPassword=YES
      SkipProductKey=YES
      SkipPackageDisplay=YES

      SkipApplications=YES

      SkipDeploymentType=YES
      DeploymentType=NEWCOMPUTER

      UserID=UserAccount(user with access to network files)
      UserDomain=DomainName
      UserPassword=UserPassword

      WSUSServer=http://WsusServer

      _SMSTSORGNAME=What you want to appear in the deployment wizard

      SkipDomainMembership=YES
      JoinDomain=DomainName.local
      DomainAdmin=AdminName(admin with permissions to join domain)
      DomainAdminDomain=DomainName
      DomainAdminPassword=password

      SkipCapture=YES
      ComputerBackupLocation=AUTO

      SkipUserData=YES

      SkipTaskSequence=YES
      TaskSequenceID=W7E_XPS13

      SkipComputerName=YES
      OSDComputerName=%SerialNumber%

      SkipLocaleSelection=YES
      UILanguage=en-US
      UserLocale=en-US
      KeyboardLocale=en-US

      SkipTimeZone=YES
      TimeZoneName=Central Standard Time

      SkipBitLocker=YES
      BDEInstall=TPM
      BdeInstallSuppress=NO
      BDeWaitForEncryption=False
      BDEDriveSize=2000
      BDEDriveLetter=B:
      BdeRecoveryKey=AD
      BDEKeyLocation=\\Server\Share (location to store BitLocker key)

      SkipSummary=YES

      ;Flash Player ActiveX 32bit
      MandatoryApplications001={26fff824-35e5-4adb-87d8-e6f1ed56f1d0}
      ;Oracle JRE 32bit
      MandatoryApplications002={22e6ef66-5d71-4dcb-a3a0-ae092f6cd3dd}
      ;LogMeIn Free
      MandatoryApplications004={1d1623e9-683e-45e7-bd3e-a1a1d576f764}
      ;Foxit Phantom
      MandatoryApplications006={96545ba5-e002-4032-b4d0-26b6de044e44}
      ;Apple iTunes(Don't judge me, our executives/sales LOVE iPads/iPhones)
      MandatoryApplications007={6cc8b7e6-e85a-40b0-9881-4bc6975503bb}
      ;Firefox 14 w Flash
      MandatoryApplications008={999decb7-ce92-4f14-bbfe-85ad312aba9c}
      ;Flash Player ActiveX 64bit
      MandatoryApplications009={6efb0b72-633c-489d-afa6-dd1abfe79f8c}
      Once you have configured all of your settings,  save the changes and exit the properties window.

      Step 9. Update Deployment Media
      • Right click on your newly created Deployment Media and select "Update Media Content".  This will copy everything in your selection profile to the UNC path as well as create new Windows PE boot media.
      • From the destination directory, copy everything from the "Content" folder to your USB Flash Drive.
      That's it!  At this point you should be able to pop the flash drive in your XPS 13, hit F12 at startup and deploy your XPS 13 from the flash drive.